docker
docker 导致 ufw 不生效问题,解决方案:编辑 /etc/docker/daemon.json,增加 "ip": "127.0.0.1",这样默认端口映射是回环地址,而不是所有地址。
pip: RUN pip install -i 'http://mirrors.cloud.aliyuncs.com/pypi/simple/' --no-cache-dir --upgrade -r /code/requirements.txt
换了几个源,就阿里源 最有效
build 时使用 --build-arg HTTP_PROXY= --build-arg HTTPS_PROXY=
- Compose 模板文件支持动态读取主机的系统环境变量和当前目录下的 .env 文件中的变量。
- compose migrate to v2
- compose.yml 是最新的
- compose down
- 外部 volume
- environment variable,优先级
- good compose example
- production
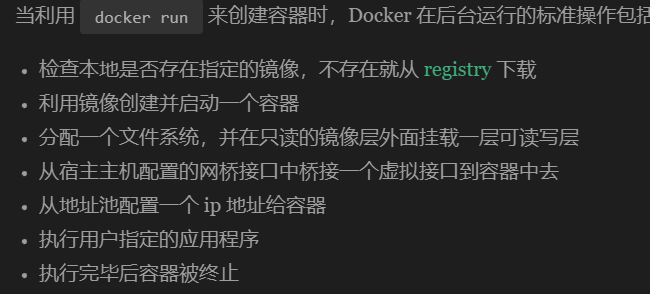
tail -f /dev/null来使容器持续运行docker run -w设置容器的工作目录docker build出来的似乎默认是自身的平台如amd64.dockerignore当复制时会忽略其中的文件docker image history <image-name>
命令
docker run
-i 交互,让容器的标准输入保持打开
-t 分配伪终端
–rm 容器退出后就将其删除
-p 指定端口映射
-P 随机端口映射,且容器的端口会默认配置,即 nginx 80,docker 8000等
-d 后台
–restart=always 自启
–link <container-name/container-id>:alias
-u root //root 身份运行
–network my-net
bash (shell)docker images
列出已经下载的镜像(顶层)
后可加仓库名,标签。
可用 -f 参数 (–filter) 筛选器
docker system df
查看镜像、容器、数据卷所占用的空间docker rmi
docker rm
docker ps
docker logs -f <container-id>显示容器日志dockers history 显示镜像历史信息
docker attach id //旧终端,exit会到导致容器停止
docker exec -it id bash //新分配终端,exit不会导致容器停止,(推荐)
-iinteractive (with the ability to type into it), and-twith a TTY (so you can see the input and output).docker cp 主机:容器
docker info 显示 docker 相关信息
docker inspect 查看容器具体配置(ip)
docker pause 暂停一个容器所有进程
docker rename 重命名容器
docker unpause 从暂停恢复
docker version docker版本信息
docker update <containerid> xx 给某容器新增启动参数(–restart=always)
docker network create -d bridge my-net
Docker build
ADD
会自动提取 tar 文件,也可以从 url 下载WORKDIR指定工作目录USER切换指定用户CMD容器启动命令,只有最后一个生效。推荐使用CMD ["executable], "param1"]的形式。ARG是设置构建(Dockerfile)中的环境变量,容器中不会有。而ENV是都会有。EXPOSE指令是声明容器运行时提供服务的端口,这只是一个声明,在容器运行时并不会因为这个声明应用就会开启这个端口的服务。
即没有实际用处,只供查看Dockerfile 每个指令都会新建一层(FROM RUN CMD),所以RUN指令尽量合在一起写
docker build -t nginx:v3 .中的这个.,实际上是在指定上下文的目录
采用默认设置,该一级目录下应该有 Dockerfile 文件
也可以指定不是上下文路径下的不是 Dockerfile 的文件,如
-f ../Dockerfile.phpDockerFile 创建镜像是每个命令都会有一个 layer,如果改变一个内容,那么之前的命令对应的 layer 即是 cached,不用再次执行,而之后的则会重新执行一遍。这启示我们应该将一个项目中不易改变的东西(特别是下载之类的操作)放在前面,和易于修改的东西放在后面。
If CMD is used to provide default arguments for the ENTRYPOINT instruction, both the CMD and ENTRYPOINT instructions should be specified with the JSON array format.
tip
Unlike the shell form, the exec form does not invoke a command shell. This means that normal shell processing does not happen. For example,
CMD [ "echo", "$HOME" ]will not do variable substitution on$HOME. If you want shell processing then either use the shell form or execute a shell directly, for example:CMD [ "sh", "-c", "echo $HOME" ]. When using the exec form and executing a shell directly, as in the case for the shell form, it is the shell that is doing the environment variable expansion, not docker.-
能在达成修改所有者(组)和文件权限,校验文件
checksum,完成将文件传输到镜像的操作。来源包括:云端的文件,本地文件,本地文件夹(只会复制其中内容),本地压缩文件(根据内容判断,而不是文件名,将自动解压),
git(不用git命令而达成克隆下来的效果)
entrypoint 作用是可以将容器作为命令执行(即可以在原来命令基础上增加参数),和 CMD 的结合见上个连接。
multi-stage builds
1 | |
其中用到的 scratch
总结一下,一个是可以从 FROM 入手,来在之前的镜像做操作。用 FROM nginx:latest AS web 来创建别名。
一个是从 COPY 入手,从之前镜像(可以是同文件中,也可以是其他文件)复制文件过来。
这种好处是,之前用的镜像层最终并不会存在,能有效降低镜像大小。
Docker compose
迁入
v2,可以省略版本号,命令变为docker compose upIn
compose.yamlThe name will automatically become a network aliasWhen you ran the container with docker run, Docker created the named volume automatically. However, that doesn’t happen when running with Compose. You need to define the volume in the top-level volumes: section and then specify the mountpoint in the service config.
同一个 compose 文件会自动创建一个网络,所有 service 都处于同一个网络中,且自动设置别名。而 volume 需要显式声明。
如果是用已有的 volume,那么需要声明是外部的
docker compose logs -f (<service_name>)By default, named volumes in your compose file are not removed when you run
docker compose down. If you want to remove the volumes, you need to add the –volumes flag.
profiles
对于一个 service 可以有多个 profiles,只有当其中之一的 profile 启用时才会启动该服务,对 debug, deploy 有用。
1 | |
对于 docker compose up 只会运行 web
docker compose up phpmyadmin 会失败,因为只会默认启动 phpmyadmin 的 profile,没有 dev 所以失败。
1 | |
multiple compose file
watch
用于监视文件变化,来进行相应的 sync(和 bind mount 类似),rebuild(重建镜像)和 sync+restart(同步加重启,如 nginx.conf)
1 | |
secrets
-
就是在容器
/run/secrets下创建文件,文件内容是实质内容,所以用这个功能需要镜像做文件支持。Services can only access secrets when explicitly granted by a secrets attribute.
denpendency
注意可以用 health-check
数据卷
数据卷是被设计用来持久化数据的,它的生命周期独立于容器,Docker 不会在容器被删除后自动删除数据卷,并且也不存在垃圾回收这样的机制来处理没有任何容器引用的数据卷。如果需要在删除容器的同时移除数据卷。可以在删除容器的时候使用docker rm -v这个命令。docker volume prune 删除无用数据卷
docker volume ls 查看数据卷
docker volume create my-vol 创建数据卷
--mount type=bind,source=/src/webapp,target=/usr/share/nginx/html1
2
3
4
5
6
7
8
9
10
11
12
13
14
15
16
17
18
19
20
21
22
23
24
25
26
27
28
29
30
31
32
33
34
35
36
37
挂载数据卷
## 杂
- **dangling image** 虚悬镜像
由于新旧镜像同名,旧镜像名称被取消,从而出现仓库名、标签均为 `<none>` 的镜像。
docker image ls -f dangling=true 专门显示虚悬镜像
一般来说,已经失去存在意义,可以删除
docker image prune 删除虚悬镜像
- 中间层镜像(与顶层镜像相对)
docker image ls -a(显示所有)
- 
- `ctrl` + `p follow q` 后台运行,即一直按着 `ctrl`,然后先按 `p`,再按 `q`
- docker compose up 失败,记得移除相关镜像和容器再重试
- daemon默认监听的是/var/run/docker.sock这个[套接字](https://so.csdn.net/so/search?q=套接字&spm=1001.2101.3001.7020)文件,所以docker客户端只要把请求发往这里,daemon就能收到并且做出响应,也就可以实现docker ps,docker images这样的效果。
- --privileged 作用:
使[container](https://so.csdn.net/so/search?q=container&spm=1001.2101.3001.7020)内的root拥有真正的root权限,否则只是外部的一个普通用户权限
- 挂载文件时
如果用 vim 这种会改变 inode 的方式改变宿主机的文件时,docker 容器并不会实时更新,因为 docker 容器是根据 inode 来查找文件的。
而如果用 cat , echo 这些不会改变 inode 的方式,就会实时更新
但是!!!被修改的文件,只要 other 的权限中包含写 (w) 权限,vim 在保存时,将不会修改 inode 信息!!!
- 使用 portainer 可视化管理容器
```shell
docker run -d --name portainer -p 9000:9000 -p 8000:8000 -v /var/run/docker.sock:/var/run/docker.sock -v ~/portainer:/data --restart=always portainer/portainer:latest
= Dockerfile 中 cd 命令无效(分层存储,各命令独立)
volume mount
- volume 不同于直接的挂载命令,创建一个 volume 是直接由 docker 管理的。
docker volume inspect todo-db
bind mount
- share a directory from the host’s filesystem into the container.
- 通过挂载,就能使你本机不安装环境,而在容器中安装环境来实现测试你的源码
Multi-container apps
There are two ways to put a container on a network:
- Assign the network when starting the container.
- Connect an already running container to a network.
use
--network-alias, then docker can resolve the alias to the IP address of the container that has the network aliasuse
docker run -it --network <network-name> nicolaka/netshootanddig <aliasto find the IPdocker 映射只能映射自身 IP 的地址
WSL 访问 host IP 会自动转发到
127.0.0.1,Host 访问127.0.0.1会自动转发到容器服务
docker network
The Docker bridge driver automatically installs rules in the host machine so that containers on different bridge networks cannot communicate directly with each other.
同一个 compose 文件会自动创建一个网络,所有 service 都处于同一个网络中,且自动设置别名。而 volume 需要显式声明。
默认为 bridge 网络模式,且 When you start Docker, a default bridge network (also called bridge) is created automatically, and newly-started containers connect to it unless otherwise specified.
所以安装 docker,默认有一个虚拟网卡(docker0),其对应的就是默认的 bridge network,他的地址刚好就是这个地址的网关地址;当你每创建一个 bridge 网络时,都会产生一个虚拟网卡,网卡对应的地址即是网关地址(这也是为什么主机能与容器网络连通的原因)。
differences-between-user-defined-bridges-and-the-default-bridge
-i是可以输出,-t是分配终端,即没有-i则输入啥都没用,没有-t则 tty 都没有直接退出。所以需要让 centos 后台运行,最少需要-td选项,然后可以在exec -it时再指定 i 选项。注意如果不是运行终端(比如是 web 服务器),则也可以只指定-ddefault network 不能设定
net-alias!!!dind。但大部分情况并不需要dind,只是需要在容器中运行 docker,所以只需要expose the Docker socket to your CI container,jenkins 中使用 docker
If you want to use e.g. Docker from your Jenkins CI system, you have multiple options:
-v /var/run/docker.sock:/var/run/docker.sockinstalling the Docker CLI using your base image’s packaging system (i.e. if your image is based on Debian, use .deb packages),
using the Docker API.
remote access and context,context 在下一章。使用
docker context create wsl --docker "host=tcp://<ip>:2375来创建环境The only thing that really leaves is, like labels, information that can be found by docker inspect on an image. I don’t know if there are any tools that display than information. But I’d probably leave the EXPOSE line in my Dockerfile as a hint to the next person to maintain the system as to what I expect it to do. 即
expose作用只是提醒有哪些端口是有作用的,如果不publish还是没用的(虽然还是监听端口)h。